
Where it began
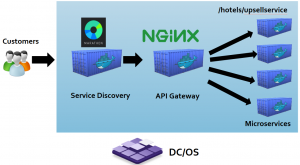
In the past five years, there’s been a big shift towards microservices and containers in the technology space. Microservices allow us to decouple domain knowledge between services, keeping them simple which increases velocity at which we are able to place software in customers hands. Being able to deliver software fast helps us respond to changes as well as get features out that benefit our customers.
Containers play a vital role in dependency management and act as a packaging mechanism for bundling software into portable processes.
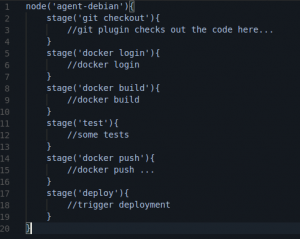
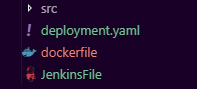
Ever since we’ve moved to containers our philosophy evolved around keeping it simple. Therefore every microservice git repository has a folder for source code, a JenkinsFile for CI/CD, a dockerfile that describes the dependencies of our software and a deployment YAML file that describes the services infrastructure as code. Therefore keeping source repositories very simple
Kubernetes
Kubernetes at Webjet is our go-to orchestration platform for running distributed systems, allowing our engineering teams to become way more efficient in delivering and running software. Kubernetes also allow us to pass ownership of production services to self-organised development teams, making teams self sufficient. As we build out more features for our system, we would add them is loosely coupled services instead of adding more code to our legacy code base. You may read about our monolith to microservices journey in the link below:
At Webjet, we run everything on Kubernetes…
Well not everything…
Yet!
We’ve written about our story “Monolith to Microservices” which dives into our journey of breaking down our legacy application into microservices using containers and Kubernetes. For many companies, it’s not always possible to completely decouple the entire legacy system into microservices.
Our approach was to target low hanging fruit, moving parts that are easy to move that have low impact to the over all system if something went wrong. Another approach was to make a decision whereby we would not tact on new features to the legacy system, but instead build out new services for new features. These new services would go into Kubernetes. By following these two principles, we were able to shrink our legacy system over time.
The legacy system still plays an essential role in our business and it would not be of value to invest more development time in further decoupling and rewrite unless new features come up that allow us to prioritise and do so.
As the legacy system shrinks in size, it’s stability over time also improves since no big changes are being made to its code base. Our microservices journey has taught us a lot about the benefits of container and container orchestration systems. Was there a way we could overlap the benefits of containers and Kubernetes with our legacy system ?
Windows Containers
At Webjet our move to container based software has had a number of benefits which resulted in faster delivery, reliable software and productive engineering teams. Moving our legacy application to containers would allow us to inherit all those benefits allowing us to deploy our legacy system more frequently. The health probe and self healing features of Kubernetes will allow us to add a great degree of stability to the legacy system. More-so containers scale well especially when scheduled using Kubernetes it allows us to run a legacy process per CPU core. Using horizontal and vertical autoscalers would allow us to scale the system down during off peak and ramp up during peak times. With the current infrastructure, it’s not a simple task to scale up our system.
To get the benefits of containers and Kubernetes, is where Windows containers come in. The aim was that we could shift the code base to Windows containers with minimal or no changes to code.
Challenges & Highlights
Moving our codebase into a Windows container was fairly straight forward. Microsoft provides a base container image on Docker Hub, with the latest Windows Server 2019
FROM mcr.microsoft.com/dotnet/framework/wcf:4.8-windowsservercore-ltsc2019
This base layer already has IIS web services installed, so it’s just a matter of adding our compiled code to it.
Our first and most obvious obstacle was that we knew we needed a Kubernetes cluster capable of scheduling windows containers. Luckily, since we’re running in Azure, Microsoft announced General Availability of Windows node pools for Azure Kubernetes Service.
This means we can run Windows Server Core 2019 nodes in our existing cluster with relative ease:
az aks nodepool add \
--cluster-name $CLUSTER_NAME \
--name="windows-server" \
-g $RESOURCE_GROUP \
--node-count=2 \
--os-type Windows
Once deployed, we can see Linux and Windows machines running side by side:

We are able to schedule windows containers using the same deployment specs we use for microservices. When writing a deployment spec, its important to use node selectors to ensure your Windows services run on Windows machines only, by adding a node selector:
nodeSelector: "beta.kubernetes.io/os": windows
What about our database ?
It’s very important that our legacy application has access to its database. The legacy system needed to run on the same Azure Virtual Network as the database to ensure reliable connectivity and low latency.
To achieve this, we followed a two step process. Firstly, containers in Kubernetes run on isolated container networks per machine as illustrated below.

By default, containers on one machine cannot talk to containers on another machine. Kubernetes solves this with kube-proxy

The challenge is that kube-proxy is designed using Linux iptable features provided by the kernel, which are not available in the Windows operating system. In order to get containers to be able to talk between machines, we use the Azure Container Network Interface plugin (Azure CNI). This plugin allows all containers in Kubernetes to get an IP Address from the Azure Virtual Network IPAM tooling

This means our containers can now talk freely between Azure Virtual Machines as well as other Azure services on the Virtual Network since they get an Azure private IP address on the Azure network. This is essential for networking to function as well as our legacy system to be able to talk to its database. The next challenge was to see how we would bridge the Kubernetes Virtual Network with our existing database network in Azure.
Virtual Network Peering
Azure networking allows engineers to seamlessly peer Virtual Network subnets to one another using a feature called VNET peering. This allows us to connect our Kubernetes network to our database network. The two peered networks would communicate with one another over Microsoft’s private network:

There are two points to note here. 1) Is to ensure you allocate enough IP addresses in your Kubernetes subnet and configure Azure CNI to allow for more IP addresses to be available to containers in Kubernetes. The default number of IP addresses available is set to 30, which we increased to 110.
2) Thereafter we also had to ensure there was no subnet overlap between the two peered networks to allow peering to succeed. Peering networks in Azure is only possible if all network subnets have unique ranges that do not overlap.
Time Zone & Culture Settings
For our legacy system to work without significant code changes, we need the timezone of the server set to Australian time. Firstly all Azure VM’s part of the Kubernetes cluster runs in UTC time zone. This is the default and a good practice for servers to maintain. However, our legacy system relies on Australian time zone and since it’s quite a large complex codebase, there would be a significant effort required to change and test the impacts of running in UTC time.
The challenge is that windows containers cannot run in a separate timezone to the host. The “Set-TimeZone” command that triggers a system call to the host operating system is blocked in windows containers and triggers an Access Denied error. In Docker it’s considered best practice for containers not to manipulate the host operating system. However since Windows container runtime does not offer the ability to run containers on a separate time zone, we had to come up with a solution.
To workaround this problem, we’ve built a daemonset that is a specialized pod that runs on each node in the cluster. When the pod starts up on a existing or new node, it’s sole purpose is to perform an SSH command to its host and set the timezone. The daemonset gets its host IP address from the Kubernetes downwards api. Using SSH allows us to perform the command on the host, without a system call through the container runtime..

Logging and Monitoring
In Docker, the best practice for writing logs is to send them to stdout by default. This ensures the container runtime can gather logs of each container on the host. If the container throws an error and terminates, the container runtime would have the logs for that crash on the host. This helps us achieve centralised logging with log extraction services like Fluentd.
There are two problems at a glance. Firstly windows services do not always write their logs to stdout. Our system writes all its logs to Event Viewer in Windows. The second problem was even if our application was writing to stdout, The IIS process that would run as process 1 inside the container does not write its child application process logs to stdout either.
In order to get all Event Viewer logs out to stdout, Microsoft have built a Windows container tool set on GitHub, with the purpose of improving Windows container experience to align some of the missing bits that Windows containers have in the eco-system. “LogMonitor.exe” helped us get all our Event logs to stdout so the logs could be extracted out of the container to achieve centralised logging.
Performance and Stability
The final test for us was to ensure the system is stable over time. To test this out we’ve built up a simple performance test that would perform constant flight searches on the stack using a utility called WRK.
We schedule a number of “wrk” containers as pods on Kubernetes running inside the cluster with a simple pod spec
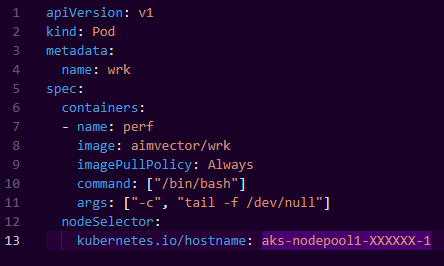
We can ramp up traffic by adding more wrk pods, and leave this running for a couple of days to look out for things like the process health, system health, memory leaks and any unforeseen stability issues that may arise.
So far our testing in terms of performance and stability is on par with the current legacy infrastructure. The process has been pretty seamless and smooth helping us to transition to a container based infrastructure quite soon.
What’s Next?
Next up, we will be shifting our focus to the existing CI/CD pipeline for our legacy application. There are a couple of challenges remaining:
- Since our container image can only build on Windows Server Core 2019, How do we build the container image in our existing build server ?
- Configuration and Secrets – Since our legacy system relies heavily on a transformation process to inject secrets and configuration files per environment, What would this look like in the Kubernetes world ? Kubernetes provides the ConfigMap and Secret API which does not currently align with our methods of deployment configuration and secrets for the legacy system. Our engineering teams will come up with a strategy to evolve this process to be container native.
These are exciting times ahead, and if you are interested to see more on these CI/CD developments and other activities in the platform engineering space, stay tuned to our tech blog.